How to Display the Geometry of Your Experiment ?
The tutorial is so simple, that I will just explain all the part of the code, then you'll be able to understand everything and play yourself.
1. The Includes
First, we  have to include all standard libraries...
 If you are working only on windows or only on linux, you can suppress the includes for the other OS.
  #ifdef linux
   #include <GL/gl.h>
   #include <GL/glu.h>
   #include "../../Includes/GLUT/glut.h"
 #else
	#define _CRT_SECURE_NO_DEPRECATE 1
	#include <windows.h>
	#include <gl/gl.h>
 	#include <gl/glu.h>
 	#include <gl/glut.h>
 	#pragma comment (lib,"glaux.lib")
 	#pragma comment (lib,"glu32.lib")
 	#pragma comment (lib,"opengl32.lib")
 	#pragma comment (lib,"glut.lib")
 	#pragma comment (lib,"glut32.lib")
 #endif
 #include <stdio.h>
 #include <math.h>
Now, comes the include specific to FROG :
FROG_DetId.h is useful to name your detector using some "standard".
FROG_Geometry is needed to store your detector hiearchy
Finaly, FROG_Element_Tools, contains a large number of includes, and function useful for the writing/reading of the geometry (but also for the events)
#include "../../Includes/FROG/FROG_DetId.h"
#include "../../Includes/FROG/FROG_Geometry.h"
#include "../../Includes/FROG/FROG_Element_Tools.h"
2. The main
This tutorial, only use one function (the main). I will now describre all FROG function the main calls.
The first thing to do in order to create your hiearchy, is to define the root. The root is by definition alway a FROG_Element_Base with the C_PRIMARY ChunkId.
The ChunkId is basically the Id that tell frog how to read/write that kind of element! Then you can create any kind of branch on this root. In this tutorial we are interested in the geometry so we will plug a new FROG_Element_Base with a C_GEOMETRY chunkId on this root.
int main()
{
   // This element is the root of the "file" tree.  (don't change this line)
   FROG_Element_Base* prim = new FROG_Element_Base(C_PRIMARY);
   // This element is the geometry branch of the tree.  (don't change this line)
   // When the element have been created, we have to attach it to the root (or more generally to the mother branch).
   FROG_Element_Base* mygeom = new FROG_Element_Base(C_GEOMETRY);
   prim->addDaughter(mygeom);
We can now add a group of detector in the geometry branch. Group of detector can be of three types :
FROG_Element_Base, FROG_Element_Base_WithDetId or FROG_Element_Base_WithDetId_And_Name. The second type is prefered, because it allow you to give a "name" (a detId) to a your group of detector. This name can then be use to display all the dectector in the group. While the third type you can really give a name to a group of detector in addition of the DetId. In this tutorial we will create a "face" geometry. So we can call the group of all the fact part the head. We can then plug this
branch on the geometry branch.
	// This a particular geometry branch : this allow us to group all the detectors attached to this branch.
   // Moreover, this group of detector has a detId, which allow us to easily "call" this group (e.g. for the display).
   // Warning : be sure that the detId is not already use by an other detecor.  (detId should be bigger than 1000000).
   // Warning : an empty group (containing 0 elements) can not be save.
   FROG_Element_Base_With_DetId* head = new FROG_Element_Base_With_DetId_And_Name(9000000, "Head");
   mygeom->addDaughter(head);
We can now plug on this head other group of "detectors", for example the mouth or the eyes. Remember that you can create as much group as you want (and as deep as you want too!). So make the groups in order to suit your detector geometry as well as possible.
	// It is possible to make groups inside a group. (as deep as you want)
	FROG_Element_Base_With_DetId* mouth = new FROG_Element_Base_With_DetId_And_Name(9100000,"Mouth");
	head->addDaughter(mouth);
	FROG_Element_Base_With_DetId* eyes = new FROG_Element_Base_With_DetId_And_Name(9200000,"Eyes");
	head->addDaughter(eyes);
Now that all the main groups have been created, let's fill them with all the low level parts. We can start with the eyes.
Note : the variable DetIdCount is used to be sure that all the detectors (or groups) have a different detId/name. Otherwise can have unpredicted effects.
The eyes can be represented by 2 spheres. So let's create two leaves on the branch "eyes". Each eye leaf are of type : FROG_Element_Primitive_Sphere. There are defined by a detId, a radius and the position of the center in X,Y,Z coordinates.
Note : a large number of FROG_Element_Primitive exist in the Frog includes directory : "Includes\FROG", some of them are listed below :
- FROG_Element_Primitive_Circle
- FROG_Element_Primitive_Cube
- FROG_Element_Primitive_CustomCube
- FROG_Element_Primitive_CustomSurface
- FROG_Element_Primitive_Cylinder
- FROG_Element_Primitive_Disc
- FROG_Element_Primitive_Line
- FROG_Element_Primitive_PartialSphere
- FROG_Element_Primitive_Rectangle
- FROG_Element_Primitive_Sphere
You can find the constructor of these objetcs in the header file : FROG_Element_Primitive_*.h
	// This variable will allow us to do not use twice the same detId.
	unsigned int DetIdCount = 0;

	// We'll fill the group eyes with 2 primitive objects.  A lots of primitive objects can be use in FROG.
	// You can find all the primitive header files in <FROGDIR>/soft/Includes/FROG/FROG_Element_Primitive_*.h
	// There is also some CMS oriented dataformat : <FROGDIR>/soft/Includes/FROG/FROG_Element_Geom_*.h
	// Do not hesitate to add your own primitive objects.  There are really easy to do (takes an existing primitive as example
	// and copy/paste to build your own).
	FROG_Element_Primitive_Sphere* eye1 = new FROG_Element_Primitive_Sphere(400000000+DetIdCount,15,0,75,35);
	eyes->addDaughter(eye1);   DetIdCount++;

	FROG_Element_Primitive_Sphere* eye2 = new FROG_Element_Primitive_Sphere(400000000+DetIdCount,15,0,75,-35);
	eyes->addDaughter(eye2);   DetIdCount++;
We can
now create the mouth, which is in
very good approximation, only composed of tooth. They are also represented by spheres (yes, I agree... it's a bit strange ;-) )
	// Now we are ready to build the mooth.
	for(double phi=-160;phi<=-20;phi+=10){
		FROG_Element_Primitive_Sphere* tooth = new FROG_Element_Primitive_Sphere(400000000+DetIdCount,5,0,80*sin(phi*0.0174),80*cos(phi*0.0174));
		mouth->addDaughter(tooth);
		DetIdCount++;
	}
Damned..., We have forgotten the nose... It is not a problem, because we can plug branch in any order... (we can also fill the branch before plug in it!)
So, it is not an issue... we can plug the nose now! Let's draw it as a cylinder...
	// Oooops.... We forgot the nose. We can use a cylinder to build a nose.
	FROG_Element_Base_With_DetId* others = new FROG_Element_Base_With_DetI_And_Named(9300000,"Others");
	head->addDaughter(others);

	FROG_Element_Primitive_Cylinder* nose = new FROG_Element_Primitive_Cylinder(400000000+DetIdCount,8,-10,10,0,0,-45,15,10,2);
	others->addDaughter(nose);   DetIdCount++;
Now the very final step is to create the geometry object from the tree and then store everything in a .geom file. This can be done easilly thanks to the FROG_Geometry::Save function. Which just ask the name of the file as argument. Then we can also print out the tree hierachy to be sure that everything is correct.
  	// Now that the geometry tree is build.  We can create the geometry objects with this tree.  The geometry Object
	// will handle the writting/reading of geometry files.  It has also a very useful function to get a branch or a leaf of the tree
	// from his detId (Geometry::FindByDetId).
	FROG_Geometry* CustomGeom = new FROG_Geometry(prim);
	CustomGeom->Save("MyCustomGeom.geom");

	// Last but not least, the FROG_ELEMENT::PrintTree function will print on the screen the tree arborecence.
	// Check this print out to see if your groups are done as you want, and to see if no modules are missing.
	FROG_ELEMENT::PrintTree(prim);

	// If everything is fine, You just have to update the FROG's config.txt to load your geometry.
	// You can for instance replace
	// InputTrackerGeom = ../test/Tracker.geom;
	// by
	// InputTrackerGeom = <FROGDIR>/soft/Examples/01_Build_a_Custom_Geometry/MyCustomGeom.geom;
	return 0;
}
3. The Frog config file
The very last thing to do is to setup the frog config.txt file in order to display our new geometry. The tag GeomToDisplay can be use to set the group of detector to be drawn (9000000=Head).
A config file example can be downloaded here. This file just contains the following tags :
// input geometry file
InputGeom = {Examples/01_Build_a_Custom_Geometry/MyCustomGeom.geom};

GeomToDisplay = {9000000};
ActiveViews = {View3D};

View3D_Type           = 3D;
View3D_Viewport_X     = 0.0;
View3D_Viewport_Y     = 0.0;
View3D_Viewport_W     = 1.0;
View3D_Viewport_H     = 1.0;
View3D_Cam_Pos_Theta  = 0.4;
View3D_Cam_Pos_Phi    =-0.6;
View3D_Cam_Pos_R      = 300;
View3D_Animate_Rotate = false;
View3D_Animate_dphi   = 0.005;
//View3D_Geom         = {9000000};

// The Extension of File Containing ScreenShots
// PNG, PS, EPS, TEX, PDF, SVG and PGF(Experimental) Can be used
Screenshot_Format = png;

// WARNING : TABULATION CREATES BUGS & ERRORS
// SO PLEASE, USE WHITE SPACE INSTEAD OF TABULATION.
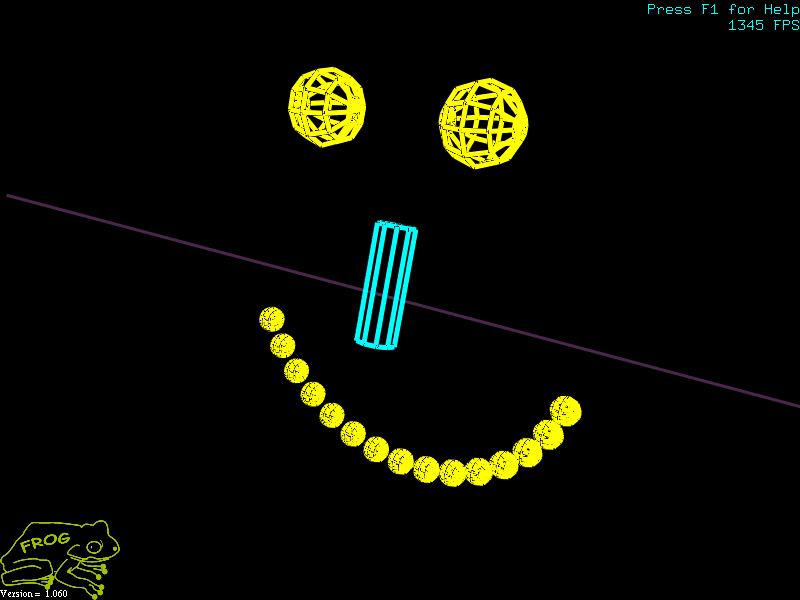
4. The Results
The full code, with the makefile and the visual c++ project can be found in "/Examples/01_Build_a_Custom_Geometry".
Have fun, and please send me a screenshot of your geometries/faces...
|